A leaking shower tray is a serious but often overlooked problem in UK homes. Unlike a dripping tap, a shower tray leak can cause structural damage, damp walls, mould growth, and even ceiling damage in rooms below. Many UK homes, especially older terraced houses and flats, suffer from hidden leaks that go unnoticed for months.

This guide provides a complete breakdown of how to identify, fix, and prevent shower tray leaks effectively.
Why Shower Trays Leak in UK Homes
Shower trays are designed to be waterproof, but over time, several factors can lead to leaks.
Common causes include:
1. Failed silicone sealant
The most common issue. Silicone degrades over time, especially in humid UK bathrooms.
2. Poor installation
Many leaks originate from improper fitting of the tray or uneven flooring.
3. Movement in building structure
Older UK properties often shift slightly over time, breaking seals.
4. Blocked or loose waste pipe connections
Water may escape beneath the tray instead of flowing into the drain.
5. Cracks in the tray surface
Less common but more serious, especially in acrylic trays.
Signs of a Leaking Shower Tray
Early detection is crucial. Look out for:
- Damp patches on ceilings below bathroom
- Mould forming around tray edges
- Loose or cracked sealant
- Water pooling outside the tray
- Persistent musty smell
- Soft flooring near shower area
If you notice any of these, immediate action is required.
Tools and Materials Needed
To repair a leaking shower tray, gather:
- Bathroom-grade silicone sealant (anti-mould)
- Sealant removal tool or blade
- Caulking gun
- Cleaning cloths
- Anti-bacterial cleaner
- Adjustable spanner
- Replacement waste washer (if needed)
Step-by-Step Repair Process
Step 1: Identify the Source of the Leak
Before applying fixes, confirm where the water is escaping:
- Around tray edges → sealant issue
- Under tray → waste pipe or structural issue
- Visible cracks → tray replacement required
Step 2: Remove Old Sealant
Carefully cut away all old silicone using a sealant removal tool. Ensure all residue is removed, as new sealant will not bond properly otherwise.
This step is essential in UK bathrooms where old sealant often hides mould.
Step 3: Deep Clean the Area
Clean the entire edge using antibacterial cleaner. Allow it to dry completely.
Moisture is one of the biggest reasons sealant fails early.
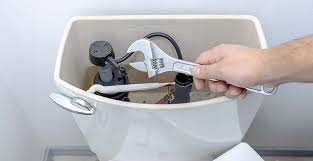
Step 4: Inspect the Waste Pipe
Access the shower waste (usually beneath the tray if accessible). Check for:
- Loose fittings
- Cracked washers
- Misaligned pipes
Tighten or replace components if needed.
Step 5: Apply New Silicone Sealant
Using a caulking gun, apply a continuous bead of bathroom-grade silicone around the entire tray edge.
Smooth it evenly for a watertight finish.
Allow at least 24 hours curing time.
Step 6: Test the Shower
After curing:
- Run water for 10–15 minutes
- Check for leaks below and around edges
- Observe drainage flow
When the Shower Tray Must Be Replaced
Not all leaks can be repaired. Replacement is required if:
- The tray is cracked
- Structural floor damage is present
- Leak persists after resealing
- Waste pipe is inaccessible or damaged
In UK homes, replacing a shower tray is often more cost-effective than repeated repairs.
Preventing Future Shower Tray Leaks
Prevention is key in maintaining a waterproof bathroom:
- Re-seal every 2–3 years
- Avoid harsh cleaning chemicals on silicone
- Ensure proper ventilation to reduce humidity
- Check waste pipe annually
- Avoid heavy pressure on tray edges
Final Thoughts
A leaking shower tray is not just a bathroom issue — it is a structural risk. In UK homes, especially older properties, early detection and proper sealing can prevent thousands of pounds in damage.
With correct maintenance and timely repairs, most shower tray leaks can be fully resolved without expensive renovation work.